This is the first part of a two-part series.
>>> Part 1 (Server Prep – Setting up the server) <<<
Part 2 (Kimchi Set-up – Getting things going)
I created this guide because there is not any real info out there on how to do this. It took me a while to figure out how to go from a fresh Fedora 26 install to a working hypervisor with full remote manageability using a web browser that also has a web-based console for the VMs. The official instructions don’t work and will not get you going at all. There is too much that is left out. Other information is either too old to be relevant or just doesn’t work.
As said above, this guide will show you how to go from a clean or fresh Fedora 26 install to a working hypervisor using KVM / qemu that you can remotely manage from anywhere via HTML5 using your web browser. This also gives you the ability to manage your virtual machines via a web-based console.
Server Prep
Host Recommendation: I recommend using Fedora 26 Server Edition using the Netinst .iso.
After you install the host OS, start at first boot following these steps:
- NetworkManager needs to go, or some things will not work later:
systemctl stop NetworkManager.service
systemctl disable NetworkManager.service
systemctl enable network.service
reboot now
- Installs the ability to use ‘semanage’. I couldn’t figure out how to get WOK accessible remotely without this:
dnf install policycoreutils-python-utils
- Installs more Cockpit stuff; the built-in install is too minimal:
dnf install cockpit
- Make sure everything is up to date. If you used Netinst, it probably is:
dnf upgrade
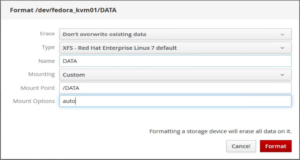
- You need a place to store your virtual machine data if you haven’t set it up during OS installation.
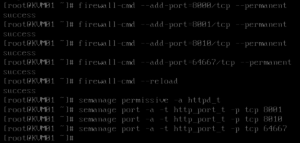
- Set up ports and access:
firewall-cmd --add-port=8000/tcp --permanent
firewall-cmd --add-port=8001/tcp --permanent
firewall-cmd --add-port=8010/tcp --permanent
firewall-cmd --add-port=64667/tcp --permanent
firewall-cmd --reload
semanage permissive -a httpd_t
semanage port -a -t http_port_t -p tcp 8001
semanage port -a -t http_port_t -p tcp 8010
semanage port -a -t http_port_t -p tcp 64667
- WOK says some prereqs require the RHEL epel repo:
wget https://dl.fedoraproject.org/pub/epel/epel-release-latest-7.noarch.rpm
- Install and update the epel repo, then remove the install file:
dnf install epel-release-latest-7.noarch.rpm
dnf update
rm epel-release-latest-7.noarch.rpm
- Install prereqs for WOK:
dnf install gcc make autoconf automake gettext-devel git rpm-build libxslt python-cherrypy python-cheetah PyPAM m2crypto python-jsonschema python-psutil python-ldap python-lxml nginx openssl python-websockify fontawesome-fonts logrotate python-ordereddict
- Download WOK, Ginger-base, Ginger, and Kimchi:
wget https://github.com/kimchi-project/wok/releases/download/2.5.0/wok-2.5.0-0.fc25.noarch.rpm
wget http://kimchi-project.github.io/gingerbase/downloads/latest/ginger-base.fedora.noarch.rpm
wget http://kimchi-project.github.io/ginger/downloads/latest/ginger.fedora.noarch.rpm
wget https://github.com/kimchi-project/kimchi/releases/download/2.5.0/kimchi-2.5.0-0.fc25.noarch.rpm
- Install WOK, Ginger-base, Ginger, and Kimchi, then remove the install files:
dnf install wok-2.5.0-0.fc25.noarch.rpm ginger-base.fedora.noarch.rpm ginger.fedora.noarch.rpm kimchi-2.5.0-0.fc25.noarch.rpm
rm wok-2.5.0-0.fc25.noarch.rpm ginger-base.fedora.noarch.rpm ginger.fedora.noarch.rpm kimchi-2.5.0-0.fc25.noarch.rpm
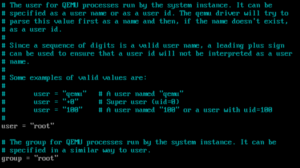
- Specify user and group for QEMU processes to be root by uncommenting the following lines below. I couldn’t get things running right without doing this:
- Reboot
reboot now
- Now you should be able to remotely access your server at:
https://IP:8001


Thanks a lot!
Your guide enabled me to to get kimchi up and running on CentOS 7.
Essentially pointing out to disable network manager , installing dependencies and enabling ports 8010 and 64667.
I disabled SELinux since I couldn’t find ‘policycoreutils-python-utils’ using yum install * right away:
nano /etc/selinux/config
advised here:
https://github.com/kimchi-project/kimchi/issues/845#issuecomment-265278866
After that hassle, I’m thinking whether it is more suitable to host a small VM and the use virt-manager to handle VM administration tasks rather than use kimchi.
Thanks again!
Thank you!
I’ve found that SSH into the host and using the virsh command is the best method for managing your KVM hypervisor. After that, the virt-manager GUI is best from another machine.
I absolutely agree!
Kimchi is very nice to look at, but with root being the only user able to login to the interface, it is somehow frightening to me.
What would be a clean way to uninstall it?
dnf remove kimchi/wok
or just disable wok.d ,
edit /etc/libvirt/qemu.conf
and edit firewall/ iptables ?