


In this post, my goal is to provide the steps one must take in a typical non-domain environment to set up Hyper-V Server 2016 or 2019 host and remotely manage it via Hyper-V Manager from a Windows 10 PC. I will split this post into three sections; what to do on the Hyper-V Server host, the Windows 10 PC, and some troubleshooting steps.
When you aren’t using Hyper-V Server in a domain in which you have group policies in place to take care of the automatic configuration of systems for seamless remote manageability, there are quite a few steps one must take on both the Hyper-V Server host and the Windows 10 PC from which you are trying to manage the host.
Most of the information out there, even as recent as September 2020, regarding managing Hyper-V remotely in a workgroup or non-domain environment, results in one of these two outcomes: not enough information, therefore leaving you still unable to connect properly to your Hyper-V host, or incorrect or too much information, leaving your systems vulnerable and insecure, possibly still unable to connect to the Hyper-V host.
Hyper-V Server 2016 or 2019 Host
All steps in this section are to be done on your Hyper-V Server host server. In this example, I am starting from a fresh install of Hyper-V Server 2016 that is fully patched and up-to-date.
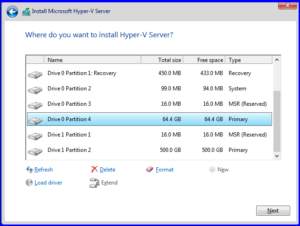
- Install Hyper-V Server 201x
- Go through the typical install dance:
- Set a password at first boot.
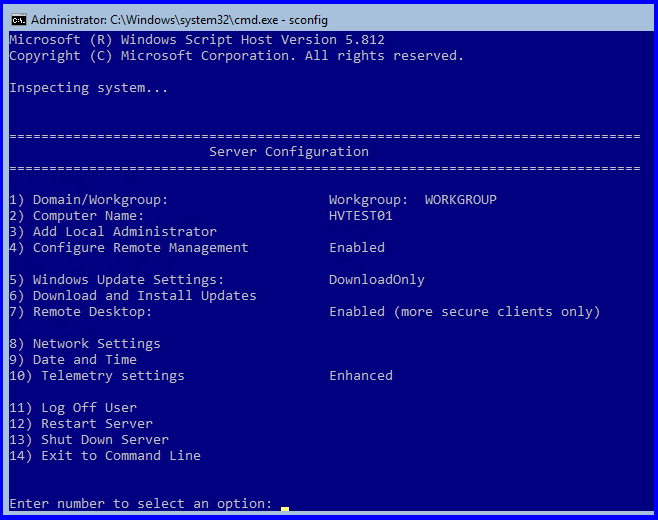
- Change the computer name in
sconfig(option 2). - Verify Remote Management is Enabled (option 4).
- Enable Remote Desktop (option 7).
- Go through the typical install dance:
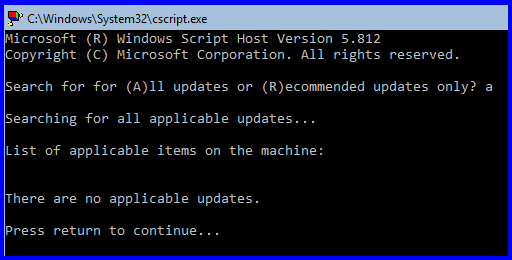
- Run Windows Update and make sure your server is 100% up-to-date. (option 6, then (A)ll updates)
- This is the most important step, because depending on which patch level Hyper-V Server 2016 is on, versus the patch level of your Windows 10 PC, you WILL get errors and will not be able to remotely connect via Hyper-V Manager.
- This is the most important step, because depending on which patch level Hyper-V Server 2016 is on, versus the patch level of your Windows 10 PC, you WILL get errors and will not be able to remotely connect via Hyper-V Manager.
- Enable PSRemoting:
- Enter the following command in an elevated PowerShell window:
Enable-PSRemoting
- Enter the following command in an elevated PowerShell window:
- Allow remote access on public zones and enable firewall rules for CredSSP and WinRM:
- Enter the following command in an elevated PowerShell window, then enter Y when prompted:
Enable-WSManCredSSP -Role server
- Enter the following command in an elevated PowerShell window, then enter Y when prompted:

Windows 10 PC
All steps in this section are to be done on your Windows 10 PC. At the time of this article’s creation, I used a fresh installed of Windows 10 Pro 1803 fully patched and up to date as of the end of July 2018. I know, scary! (but working)
- Run Windows Update:
- This is very important, and depending on which patch level your Windows 10 PC and Hyper-V Server 2016 or 2019 host is on, you WILL get errors and will not be able to remotely manage your Hyper-V host:

- This is very important, and depending on which patch level your Windows 10 PC and Hyper-V Server 2016 or 2019 host is on, you WILL get errors and will not be able to remotely manage your Hyper-V host:
- Install the Hyper-V Management Tools:
- Open up an elevated PowerShell window (Run as Administrator)
- Enter the following command, which installs the Hyper-V Management tools, then enter Y to reboot:
Enable-WindowsOptionalFeature -Online -FeatureName Microsoft-Hyper-V-Tools-All -All
- Set the network connection category to private:
- Enter the following command in an elevated PowerShell window:
Set-NetConnectionProfile -InterfaceAlias Ethernet -NetworkCategory Private- You may need to change “Ethernet” (InterfaceAlias) to match the name of your network connection(s).
- You can use Get-NetConnectionProfile to list your connections and their categories.
- Enter the following command in an elevated PowerShell window:
- Add the Hyper-V Server host to the local “hosts” file:
- Enter the following command, which appends the host name of the Hyper-V host and it’s IP address to the local hosts file:
Add-Content -Path C:\Windows\System32\drivers\etc\hosts -Value "`n172.30.32.151`tHVTEST01"- The `n is new line
- The `t is horizontal tab character
- Replace HVTEST01 and 172.30.32.151 with the host name and IP address of your Hyper-V Server host.
- Enter the following command, which appends the host name of the Hyper-V host and it’s IP address to the local hosts file:
- Configure Remote Management Service:
- Enter the following in an elevated PowerShell window, and enter Y when prompted:
winrm quickconfig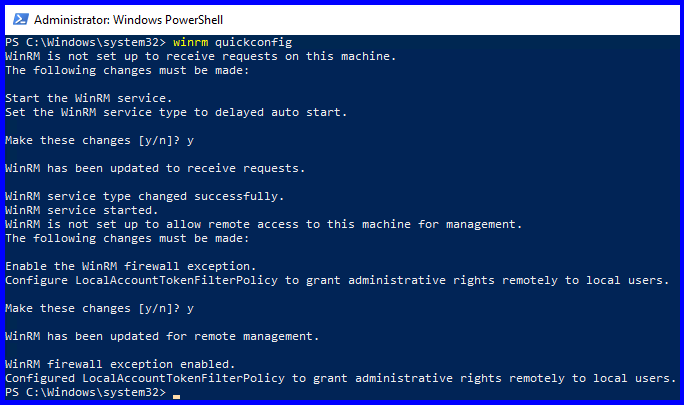
- Enter the following in an elevated PowerShell window, and enter Y when prompted:
- Add the Hyper-V Server host to the trusted hosts of the Win10 PC:
- Enter the following command in an elevated PowerShell window, and enter Y when prompted:
Set-Item WSMan:\localhost\Client\TrustedHosts -Value "HVTEST01"
- Enter the following command in an elevated PowerShell window, and enter Y when prompted:
- Allow the Win10 PC credentials to be delegated to the Hyper-V Server host:
- Enter the following command in an elevated PowerShell window, enter Y when prompted:
Enable-WSManCredSSP -Role client -DelegateComputer "HVTEST01"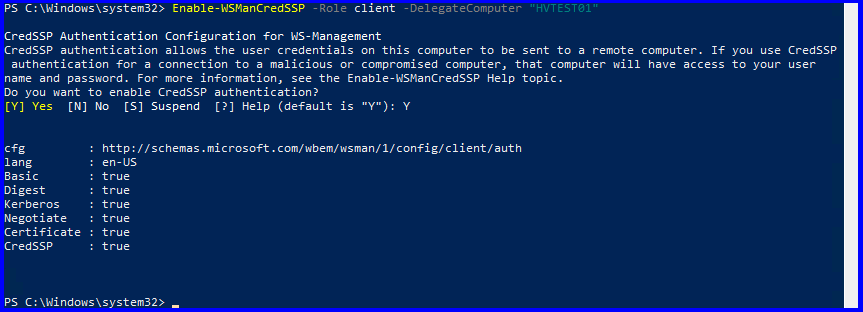
- Enter the following command in an elevated PowerShell window, enter Y when prompted:
- Allow delegating fresh credentials with NTLM-only server authentication:
- Enter the following commands in an elevated PowerShell window:
New-Item -Path "HKLM:\SOFTWARE\Policies\Microsoft\Windows\" -Name 'CredentialsDelegation'
New-ItemProperty -Path "HKLM:\SOFTWARE\Policies\Microsoft\Windows\CredentialsDelegation\" -Name 'AllowFreshCredentialsWhenNTLMOnly' -PropertyType DWord -Value "00000001"
New-ItemProperty -Path "HKLM:\SOFTWARE\Policies\Microsoft\Windows\CredentialsDelegation\" -Name 'ConcatenateDefaults_AllowFreshNTLMOnly' -PropertyType DWord -Value "00000001"
New-Item -Path "HKLM:\SOFTWARE\Policies\Microsoft\Windows\CredentialsDelegation\" -Name 'AllowFreshCredentialsWhenNTLMOnly'
New-ItemProperty -Path "HKLM:\SOFTWARE\Policies\Microsoft\Windows\CredentialsDelegation\AllowFreshCredentialsWhenNTLMOnly\" -Name '1' -Value "wsman/HVTEST01"
- Or, configure the following local group policy (does the same as above):

- Change “HVTEST01” to match the name of your Hyper-V host in either of the above steps.
- Enter the following commands in an elevated PowerShell window:
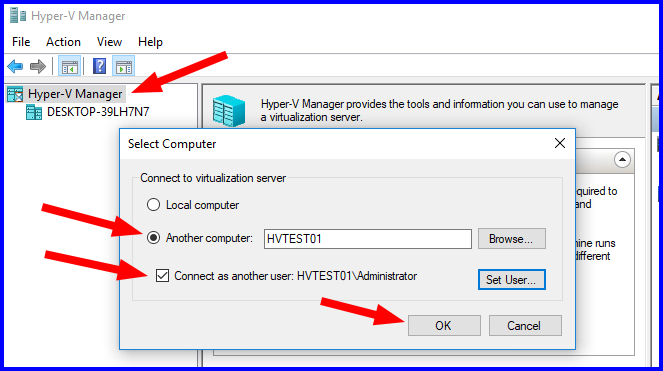
- Open up Hyper-V Manager:
- Right-Click on “Hyper-V Manager”, and select “Connect to server…”.
- Select “Another computer” and type the name of your Hyper-V Server host.
- Check “Connect as another user”, then use the local admin account of the Hyper-V Host. Check “Remember me”. Use HOSTNAME\Administrator
- Success!
- It should now connect successfully, allowing you to mange your Hyper-V Server host, set-up, and configure VMs:

- It should now connect successfully, allowing you to mange your Hyper-V Server host, set-up, and configure VMs:
Troubleshooting
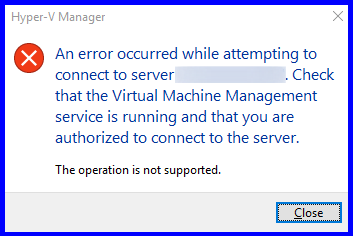
The operation is not supported
You get an error when trying to connect to the Hyper-V host (pictured below):
“An error occurred while attempting to connect to server <serverName>. Check that the Virtual Machine Management service is running and that you are authorized to connect to the server.
The operation is not supported.“
The Fix
The most likely resolution to this issue is to make sure all systems involved are up to date. This error may be related to this error:
An error occurred while attempting to connect; WinRM, TrustedHosts, operation failed…
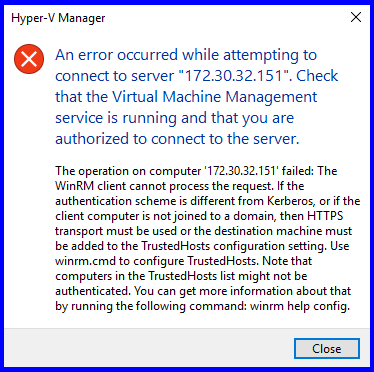
If you see the following error (pictured below):
“An error occurred while attempting to connect to server “<serverName>”. Check that the Virtual Machine Management service is running and that you are authorized to connect to the server.
The operation on computer ‘<serverName>’ failed: The WinRM client cannot process the request. If the authentication scheme is different from Kerberos, or if the client computer is not joined to a domain, then HTTPS transport must be used or the destination machine must be added to the TrustedHosts configuration setting. Use winrm.cmd to configure TrustedHosts. Note that computers in the TrustedHosts list might not be authenticated. You can get more information about that by running the following command: winrm help config.“
It means you are unable to connect to the Hyper-V Server host, and the most likely causes are that the remote server is not in the TrustedHosts and WinRM isn’t configured properly (obviously, there’s more to it than that). Hyper-V Server has the “Virtual Machine Management” service running by default, so we know it’s not that, but you can verify this by running the following command on your Hyper-V host:
Get-Service vmms
The Fix
The best way to resolve this error is to verify all the above steps have been completed.
An authentication error has occurred. CredSSP encryption…
If you see the following error (pictured below):
“An authentication error has occurred.
The function requested is not supportedRemote computer: <computerName>
This could be due to CredSSP encryption oracle remediation.
For more information, see https://go.microsoft.com/fwlink/?linkid=866660“

This error is most likely being produced due to a recent update in March 2018 to either your Hyper-V Server host or the PC in which you are trying to connect from.
The fix
To fix this error, you must make sure all systems involved are updated. This means your Hyper-V host, the VM you’re trying to access, and the PC you are trying to connect from.
Click the link below for more information from Microsoft:
https://portal.msrc.microsoft.com/en-us/security-guidance/advisory/CVE-2018-0886
References
Remotely Manage Hyper-V Hosts via Microsoft Docs:
THANK YOU, its 2024 and information online including Microsoft’s own documentation on this topic is STILL incomplete and misleading.
Agreed! I just spent 2 weeks going through MS articles, and this one worked for me exactly as written for Win11 to Win2022stdcore. Beauty!
Terribly sorry to ask, but, this is killing me. I have followed the steps to the letter and I get the error below:
The operation on computer ‘192.168.1.98’ failed: The WinRM client cannot process the request. A computer policy does not allow the delegation of the user credentials to the target computer because the computer is not trusted. The identity of the target computer can be verified if you configure the WSMAN service to use a valid certificate using the following command: winrm set winrm/config/service @{CertificateThumbprint=””} Or you can check the Event Viewer for an event that specifies that the following SPN could not be created: WSMAN/. If you find this event, you can manually create the SPN using setspn.exe . If the SPN exists, but CredSSP cannot use Kerberos to validate the identity of the target computer and you still want to allow the delegation of the user credentials to the target computer, use gpedit.msc and look at the following policy: Computer Configuration -> Administrative Templates -> System -> Credentials Delegation -> Allow Fresh Credentials with NTLM-only Server Authentication. Verify that it is enabled and configured with an SPN appropriate for the target computer. For example, for a target computer name “myserver.domain.com”, the SPN can be one of the following: WSMAN/myserver.domain.com or WSMAN/*.domain.com. Try the request again after these changes.
Would you mind please telling me what I’m missing or did wrong?
Thank you.
NVM. I’m an idiot! I was connecting to the IP while I was using the FQDN in all of the steps above.
So, I followed your steps to the letter, then tried to add the hyper-v host by IP and it failed. Then I tried with the FQDN and it worked like a charm.
Thank you for this post. It’s a life saver.
I ran into this same error, but I was able to connect without this error by changing the group policy server setting to uppercase WSMAN/HOSTNAME instead of wsman/HOSTNAME
I had to use the FQDN, not just the hostname, for this to work for me. All other steps as-is.
Thank you very much for this article. I moved and that caused my hyper-v credentials to not work anymore. This article helped me to re-install those after 3 months!
I’m trying to connect a domain-joined Windows 10 client to a non-domain Hyper-V core server. Initial attempts failed with complaints about authority. Following instructions above seems to have allowed progress but I still fail because the Hyper-V server isn’t a trusted host, even though I added it to TrustedHosts and confirmed it was in the list.
Sigh.
Damn… I been looking for this solution for ages a lot of outdated information about it online!
Thank you worked the first time!
I would have never been able to figure all that out on my own. Why must Microsoft lock things down in so many ways, and make them so difficult to figure out how to unlock? Not an approach to security I care much for…but anyway.
Everything worked great, but I had three more things I thought I should share for others’ benefit.
1) I have a DNS server, so I was able to skip adding the name/IP to the HOSTS file.
2) WinRM -quickconfig resulted in this error message: “WinRM firewall exception will not work since one of the network connection types on this machine is set to Public. Change the network connection type to either Domain or Private and try again.”
– Set-NetConnectionProfile did not fix this.
– As it turns out, My Windows 10 client is running in a Hyper-V VM that had previously been migrated from VirtualBox. There was a hidden, unused VirtualBox Virtual Network Adapter that was not showing up in the various tools used to set the network connection type. I used the Device Manager to delete that device driver, and the error went away. Check for “hidden” network drivers!
3) After following your directions, I was still getting an error message: “The WinRM protocol operation failed due to the following error: The WinRM client cannot process the request. A computer policy does not allow the delegation of the user credentials to the target computer because the computer is not trusted.”
– To fix that, I used Group Policy Editor to set:
“Computer Configuration -> Administrative Templates -> System -> Credentials Delegation -> Allow Fresh Credentials with NTLM-only Server Authentication”
to Enabled and add the hostname of my Hyper-V host server.
Thanks!
Thanks! Was banging my head trying to get this to work. Followed your steps and got it running in no time.
So I haven’t gone through these steps yet, but I think I know the answer.
This only will work for a host that’s local/remote, aka on the same subnet? If the host was on a different subnet there are additional things to fix I assume, in the firewalls on one or both systems?
Yep..
Is there a way to save the hyper-v manager to permanently point to the remote server ?.
The “Set user” area – even if I tick “remember me” for the login details for the remote computer it doesn’t remember them. Would be nice if you can save the settings in hyper-v manager – but I can’t seem to find out how to do this.
Any pointers if this is possible please
This guide saved my day!
Was following a guide from elsewhere before, which was not working.
Now everything is fine :-)))))))
Thank you
Was getting really frustrated with this, but one of the commands listed changed the game for me and it worked. Thanks for taking time.
And which one would that be?
Because this is my 5th ‘How To’ and i’m still not working.
Worked with one exception on the latest 2019 build. Server NetConnectionProfile also must be set to Private (same as PC step 3, just for server). Great guide!
Andrew,
How did you do this? I have tried SetNetConnectionProfile -InterfaceAlias Ethernet and vEthernet and neither works. I just get MSFT_SetConnectionProfile objects not found.
PS. Get -NetworkConnectionProfile shows InterfaceAlias is vEthernet and NetworkCategory is public
THANK YOU THANK YOU for such a concise and well written post!
This worked brilliantly for the first W10 client and then for the second client (Server 2019) I kept getting an error “The Hyper-V Management Tools could not access an expected WMI class on computer ‘SERVERNAME’.
This may indicate that the Hyper-V Platform is not installed on the computer or that the version of the Hyper-V Platform is incompatible with these management tools.”
I spent HOURS trying to fix this. The solution is to run the following command on the server:
MOFCOMP %SYSTEMROOT%\System32\WindowsVirtualization.V2.mof
Hope this saves someone else pulling their own hair out! 🙂
WOW! I would never have gotten connected to my Hyper-V 2019 Server labtest without this guide. Essential, thank you!
Here’s me thinking of all the hypervisors I’m gonna test, start with the easy one!
Not the first time you’ve made a difficult task easy, so I’m thanking you again. FYI, I used this on a Hyper-V Server 2019 / Windows 10 workgroup setup, and it works just like it did with 2016.
So, thanks again…
Same here, finally a great post about this crazyness. Also on a Server Hyper-V Server 2019, works like a charm…after burning a few hours on finding the right way to do this!
-Tanks!!
Installing Hyper-V server from the ISO was easy, but little did I know I d burn several days just trying to connect to it.
I just wanted to thank you for this guide.
I was finally able to connect to my VM’s without need to connect to Hyper-V server first.
Thanks!
This is a great guide. Thanks Timothy! If you’re going to use Windows Server Core or Hyper V Server, this is essential.
I’m gobsmacked that Microsoft don’t offer this kind of documentation.
Now, for the difficult question… what happens if you want to run some kind of soft-router/firewall out of a VM on your HyperVisor (eg Untangle)?
As soon as you start messing around with Virtual Switches, remote Hyper-V Management falls over.
I’m currently experimenting with a Win10 desktop build so I can create a VM image of Untangle fully configured, and then rebuild the server as a HyperVisor and mount the Untangle VM. Wish me luck.
What a great explanation. I tried several ways to connect win 10 to server. But it was failed. thx very much. save more time.
– Clear and easy to follow guide, to fix a pain in the butt problem of Microsoft’s… Thank you!
– Works on 2019 Server also.
– The Powershell command in Step 8 returns an error that the -path variable is used too many times… But the local Group Policy bypass works like a charm.
Hi, Thanks for the guide.
But, I still got an issue here.
I’m trying to connect windows 10 to windows 10 Hyper-V Manager.
Both of them were joined to the AzureAD environment. Can you enlighten me on this one. I’m stuck on the last part. where I’m trying to connect the server to my hyper-v manager
Excellent article … I had to change the name of the Server and in that sequence I lost access to Hiper-V. Due to problems with the latest updates from Microsoft, with my W10 Pro, secpol.msc and gpedit.msc stopped working, but with access to mmc.exe. Only by doing all the steps (changes) by hand, I was able to regain access to the Hyper-V.
In W10, in the PowerShell commands, step 8, I had to separate each command individually starting with “New-Item …”, but apart from that, everything is OK.
Congratulations to the author, for this article that is 2 years old and still very current.
Thanks!
Excellent guide.
Somehow my remote hyperv console didn’t work after setting a VPN connection.
Your guide saved my day !
Thanks
Thank you!
Clear and Working guide.
I was try many guides that does not work, before I found your blog.
Now hyper-v managing works fine from Win10 to Hyper-V server 2019 without domain.
I’ve been struggling for ages to get this working in a non-domain environment. Followed your guide timothy and it’s worked flawlessly, thank you.
holy christ, I can’t believe I had to go through all of this just to make this work.
Thanks a lot for this ultra precise guide, I managed to follow it wthout any issues despite my setup being in French. I tip you my hat kind sir 🙂
Thank you so much!!! Very well explained, brilliant!
BTW, these steps works for Hyper-V Server 2019 too 😉
amazing thank you Timothy, been struggling with that until read and executed your step by step
Looks like it works great for 2016, one of my Hyper-V machines is running 2012 R2 though and there are apparently issues with connecting using a different username. Is that just a feature added in the latest management tools, or will I have to find a old client machine to work from?
Timothy,
Thank you for your clear instructions. I have used core for a number of years but always in a domain, which makes it easier.
I have 2 additions:
1. I got access denied error 5 errors when I tried to access some of the entries in MMC that I needed (most local policy) . I followed the instructions here to fix the problem: https://support.gfi.com/hc/en-us/articles/360012851954-Error-Error-5-Access-is-Denied-when-attempting-to-connect-to-remote-Event-Viewer
2. I found that I needed to add wsman/* (or FQDN or IP) local policy (computer configuration/administrative templates/system/credentials delegation) on both client and server and in both “Allow delegating fresh credentials”and “allow delegating fresh credentials with NTLM-only server authorization”.
I don’t know why these apply to my system and evidently not yours, but hopefully they will save someone some time.
Thanks you saved me some time, I had to do step 2) as well on my fresh build just now
Such a PITA. I was hoping there would be a simplistic method by now…seems like there’s more steps than the last time I needed to do this a year ago haha
I haven’t tried this yet – but does this also open all required things to manage the disk and other parts of the Hyper-V server?
No, this is specific to managing Hyper-V only. Other things such as disk management require firewall and service changes.
many thanks!!!! Worked perfectly 😀
I am not able to follow step 3 because I am in a domain network that does not allow for the network type to be changed from Domain to Private. Is there any workaround for this? Step 6 fails for me with “Set-Item : The client cannot connect to the destination specified in the request. Verify that the service on the
destination is running and is accepting requests. Consult the logs and documentation for the WS-Management service
running on the destination, most commonly IIS or WinRM. If the destination is the WinRM service, run the following
command on the destination to analyze and configure the WinRM service: “winrm quickconfig”.” and I don’t know if it is related to this. WinRM is running on the remote server.
Worked beautifully! Thanks for the guide.