This is the fourth part of a seven-part series explaining and setting up a two-tier PKI with Windows Server 2016 in an enterprise SMB setting.
Part 1 (Informational)
Part 2 (Getting Started & IIS Web Server Configuration)
Part 3 (Standalone Offline Root CA Configuration)
>>> Part 4 (Enterprise CA Configuration) <<<
Part 5 (Distributing Certificates & AutoEnrollment)
Part 6 (Additional Configuration)
Part 7 (Troubleshooting & Clean-up)
To help with the layout and navigation of these longer pages, use the Table of Contents below:
Subordinate “Enterprise” CA Setup (issuingCA)
In this part, we set up and configure the subordinate Enterprise CA server named issuingCA. This server must be joined to the domain, and must have a reliable network connection.
Pre-install Steps
Before installing and configuring the AD CS role, there’s a few things that need to be done first.
Create CAPolicy.inf
Just like with the RootCA server, we also need to do this on the issuingCA server. However, the configuration will be a little different, which I will explain below.
You need to again create this file in C:\Windows\CAPolicy.inf BEFORE you install the Certificate Services role.
- On the server issuingCA, copy and paste this into notepad, and save it as C:\Windows\CAPolicy.inf
[Version]
Signature=”$Windows NT$”
[PolicyStatementExtension]
Policies=InternalPolicy
[InternalPolicy]
OID= 1.2.3.4.1455.67.89.5
URL=http://pki.bedrock.domain/pki/cps.html
[Certsrv_Server]
RenewalKeyLength=4096
RenewalValidityPeriod=Years
RenewalValidityPeriodUnits=10
LoadDefaultTemplates=0
- It’s important to configure the RenewalValidityPeriodUnits to a number that is high enough to meet the needs of your environment. Keep in mind that you will need to turn on the RootCA server every time you need to renew the certificate of this server (issuingCA).
- I configured the above parameter to 10 years, which is how long the certificate of this server will last until it must be renewed, unless for some reason it becomes compromised and needs revoked.
- Typically, you configure a Root CA to 20 years and tier 2 subordinate CAs 10 years, and so on.
- The additional parameters that we configured on the RootCA are not included in the CAPolicy.inf file on this server.
- You may exclude the PolicyStatementExtension and InternalPolicy sections.
- It’s important to configure the RenewalValidityPeriodUnits to a number that is high enough to meet the needs of your environment. Keep in mind that you will need to turn on the RootCA server every time you need to renew the certificate of this server (issuingCA).
Publish Root CA certificate to Active Directory
This next step is a good idea because it helps streamline distribution, and it will not negatively impact anything. You may also choose to publish the Root CA cert via Group Policy. This command will automatically push domain joined computers and servers to have the Root CA cert installed to their local certificate stores. Doing this via below command and via Group Policy is fine.
- On the server: issuingCA, enter the following in an elevated command prompt:
certutil.exe –dsPublish –f "C:\BEDROCK-ROOTBedrock Root Certificate Authority.crt" RootCA
Publish Root CA CRL to Active Directory
*Note:* You can skip this step, and move on to “Add Root CA cert and CRL to local store”
Don’t publish the CRL to Active Directory unless you need to. I’m not doing so in this guide and not configuring the issued certificates to check LDAP for the CRL because it’s not a good idea. Not all devices will have access to LDAP. But here is the command to publish the Root CA CRL to AD.
- On the server: issuingCA, enter the following in an elevated command prompt:
certutil.exe -dsPublish -f "C:\BEDROCK-ROOT.crl" RootCA
- Where “RootCA” above is the name of your root ca server.
- If you do publish the CRL to AD, and you decide you shouldn’t have, you can manually remove it in ADSI Edit shown below:

Add Root CA cert and CRL to local store
Finally, you need to add the Root CA cert and CRL to the local certificate stores.
- On the server: issuingCA, enter the following in an elevated command prompt:
certutil.exe –addstore –f root "C:\BEDROCK-ROOTBedrock Root Certificate Authority.crt"
certutil.exe –addstore –f root "C:\BEDROCK-ROOT.crl"
Install Certificate Services
On the server: issuingCA, install the Active Directory Certificate Services role.
- To install the AD CS role, in PowerShell, enter the following:
Add-WindowsFeature Adcs-Cert-Authority -IncludeManagementTools
- After the role is finished installing, you must configure it. Enter the following in PowerShell, changing the options as needed to fit your environment:
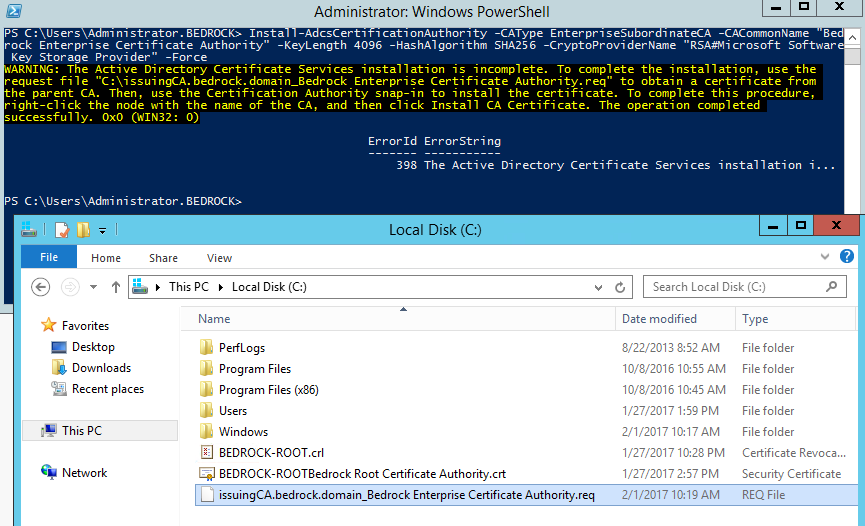
Install-AdcsCertificationAuthority -CAType EnterpriseSubordinateCA -CACommonName "Bedrock Enterprise Certificate Authority" -KeyLength 4096 -HashAlgorithm SHA256 -CryptoProviderName "RSA#Microsoft Software Key Storage Provider" -Force
- The result should look like below, and you should now have a certificate request .req file in your C:\ drive as highlighted. The warning message just means we need to request, obtain, and install a certificate from the RootCA:

Install Certificate on issuingCA
Now that the Certificate Services role is installed on issuingCA as pictured above, we need a certificate for the server before we can start the Certificate Services, as showin in the yellow warning message. This means you need to submit a certificate request to the RootCA, where we’ll then approve the request on the RootCA, get the certificate, and install it on issuingCA. Then we can finally start the Certificate Service.
Submit Certificate Request to RootCA
To submit a certificate request to the server: RootCA, perform the following steps:
- Copy the file: “C:\issuingCA.bedrock.domain_Bedrock Enterprise Certificate Authority.req” from the server: issuingCA, to the C:\ drive of the server: RootCA
- On the server: RootCA, open up the Certification Authority tool from the Tools menu in Server Manager.
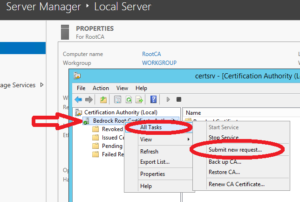
- Right-click on Bedrock Root Certificate Authority, select All Tasks, and then click Submit new request.

- Browse to the “C:\issuingCA.bedrock.domain_Bedrock Enterprise Certificate Authority.req” file and click Open.
- In Certification Authority window, select Pending Requests. If you don’t see the pending certificate request, hit refresh.
- Right-click on the request, select All Tasks, then click Issue.

- Highlight Issued Certificates, and make note of the Request ID.
- In an elevated command prompt on RootCA, enter the following, then click OK when the Certificate Authority List windows pops up:
certreq -retrieve 2 "C:\issuingCACert.crt"
- You should now have a certificate .crt file in the C drive:

- Copy the “C:\issuingCACert.crt” file to the C drive of the server: issuingCA.
Install Certificate on issuingCA
Now that we have a certificate to install on the issuingCA server, which should have already been copied from the RootCA after the request was approved and the certificate issued, we need to install the certificate on issuingCA.
- Open the Certificate Authority tool from Server Manager.
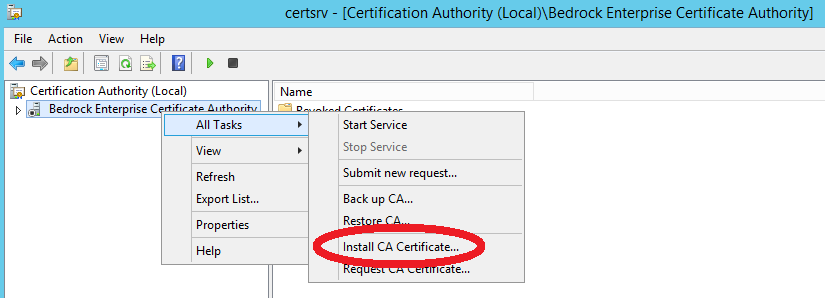
- Right-click the Bedrock Enterprise Certificate Authority, select All Tasks, then click Install CA Certificate.

- Browse to the “C:\issuingCACert.crt” file and click Open. It may take a few seconds to process.
- Do NOT start the service yet. We want to perform some configurations first in the next step.
Configuring the CA
The issuingCA is now ready to go, but before we start the Certificate Authority service, you should set some configuration changes.
- Enter the following in an elevated PowerShell window. You may copy and paste the contents in there to make it easier:
$crllist = Get-CACrlDistributionPoint; foreach ($crl in $crllist) {Remove-CACrlDistributionPoint $crl.uri -Force}; Add-CACRLDistributionPoint -Uri C:\Windows\System32\CertSrv\CertEnroll\BEDROCK-ECA%8%9.crl -PublishToServer -PublishDeltaToServer -Force Add-CACRLDistributionPoint -Uri file://\\webserv1.bedrock.domain\pki\BEDROCK-ECA%8%9.crl -PublishToServer -PublishDeltaToServer -Force Add-CACRLDistributionPoint -Uri http://pki.bedrock.domain/pki/BEDROCK-ECA%8%9.crl -AddToCertificateCDP -AddToFreshestCrl -Force Get-CAAuthorityInformationAccess | where {$_.Uri -like '*ldap*' -or $_.Uri -like '*http*' -or $_.Uri -like '*file*'} | Remove-CAAuthorityInformationAccess -Force Add-CAAuthorityInformationAccess -AddToCertificateAia http://pki.bedrock.domain/pki/BEDROCK-ECA%3%4.crt -Force certutil.exe -setreg CA\CRLPeriodUnits 2 certutil.exe -setreg CA\CRLPeriod "Weeks" certutil.exe -setreg CA\CRLDeltaPeriodUnits 1 certutil.exe -setreg CA\CRLDeltaPeriod "Days" certutil.exe -setreg CA\CRLOverlapPeriodUnits 12 certutil.exe -setreg CA\CRLOverlapPeriod "Hours" certutil.exe -setreg CA\ValidityPeriodUnits 5 certutil.exe -setreg CA\ValidityPeriod "Years" certutil.exe -setreg CA\AuditFilter 127 restart-service certsvc - The above will make the configuration changes, and then start the Certificate Authority services. You may have to refresh the Certification Authority tool for it to show as running with a green checkmark. Things should look similar to below:

Publish New CRLs
Normally at this point, you would publish the new CRLs. But because we made the configurations first before turning on the CA services for the first time, they were automatically already published to the webserver, if you changed the CDP publication locations appropriately.
If you started the CA service first before you made the configuration changes, publish the new CRL and Delta CRL per below.
- Enter the following in PowerShell:
certutil -crl
Copy AIA .CRT file to WebServer
The last step is to copy the AIA (.crt) file to the location that all issued certificates will be looking for it. You will find the AIA file at “C:\Windows\System32\CertSrv\CertEnroll\issuingCA.bedrock.domain_Bedrock Enterprise Certificate Authority.crt”
That is not the file name issued certificates will be looking for in the AIA location, so we need to copy the file to WebServ1 and also rename the file.
So on issuingCA, use the following command to copy the file over to the web server and rename the file in the process:
- Enter the following command in an elevated Command Prompt:
copy "C:\Windows\System32\CertSrv\CertEnroll\issuingCA.bedrock.domain_Bedrock Enterprise Certificate Authority.crt" "\\WebServ1.bedrock.domain\pki\BEDROCK-ECABedrock Enterprise Certificate Authority.crt"
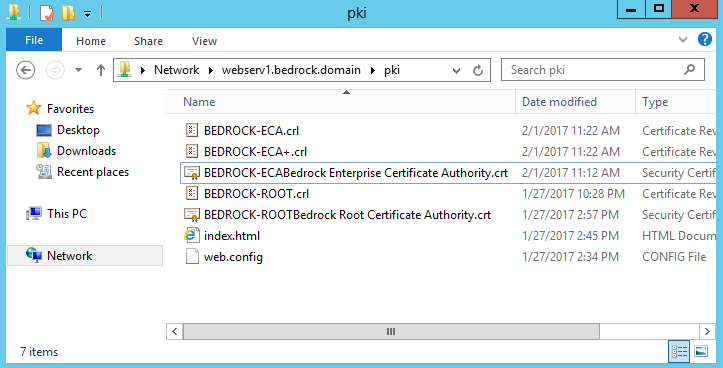
- If you look in your pki share on the webserver, it should now be there.
Wrap-up
On your webserver, whether it’s internal or external, you will need 5 very important files in there, all correctly named and highly-available. All issued certificates will check for these files, and if not available, the certificate will be invalid until you correct the connectivity or name issues.
If the above web server is not accessible publicly, and you configured your CDP and AIA url’s to a public address, you will need to manually copy the above 5 files from your internal web server to your externally hosted web server.
If you have configured your CRL and Delta CRL publication times to two weeks and 2 days respectively, you’ll find yourself having to copy the Delta CRL file to your externally hosted web server every other day. So you can either adjust that to be longer, or figure out a way to have it done automatically via scheduled task or script. Or, simply, configure public HTTP access to this web server.
The CRL timing doesn’t become important until you start revoking certificates. Depending on what you use your PKI for, you may not need to frequently revoke certs… or you may need to.
Next Steps
The Root CA and Subordinate Enterprise CA are both set up and services configured. The next step would be to install OCSP, but I’m skipping that for now and moving on to setting up Certificate Templates and AutoEnrollment for distributing certificates to users and devices. First with configuring key archival. I’ll also show how to set up a template for SSL certs, and a template for providing the ability to distribute certificates to external users. I define external users as those who are not on your domain. They may be a vendor you may need to communicate with using encrypted emails or another party.


Do both the SECA and ORCA need to be listed in the Trusted Root Certification Authorities?
Will you be posting parts 6 and/or 7?
A very good guide to follow. I see that several people asked the same question, but there never seems to come answer.
At the end you state that there should be 5 files on the webserver. There is delta crl file. I can find all 4 files except the delta (+) file. Where can we find that one?
Hi, guys. Great guidance. I completed OCSP part as well. But for some reason, my cert revocation doesn’t work… Any idea?
At the step where you mention to copy this file “C:\Windows\System32\CertSrv\CertEnroll\issuingCA.bedrock.domain_Bedrock Enterprise Certificate Authority.crt” to the web server, this file does not exist on the issuingCA server. I followed all steps, why does this file not exist?
I get an error when getting to point “Install Certificate Service”
PS C:\Users\Administrator> Install-AdcsCertificationAuthority -CAType EnterpriseSubordinateCA -CACommonName “CER Enterprise Certificate Authority” -KeyLength 4096 -HashAlgorithm SHA256 -CryptoProviderName “RSA#Microsoft Software Key Storage Provider” -Force
Install-AdcsCertificationAuthority : Active Directory Certificate Services setup failed with the following error: A value for the attribute was not in the acceptable range of values. 0x80072082 (WIN32: 8322 ERROR_DS_RANGE_CONSTRAINT)
At line:1 char:1
+ Install-AdcsCertificationAuthority -CAType EnterpriseSubordinateCA -C …
+ ~~~~~~~~~~~~~~~~~~~~~~~~~~~~~~~~~~~~~~~~~~~~~~~~~~~~~~~~~~~~~~~~~~~~~
+ CategoryInfo : InvalidArgument: (:) [Install-AdcsCertificationAuthority], CertificationAuthoritySetupException
+ FullyQualifiedErrorId : SetCAProperties,Microsoft.CertificateServices.Deployment.Commands.CA.InstallADCSCertificationAuthority
———————————————————————————-
Any clue … ?
this is what happens when I get to certsrv and perform a “retarget” :
—————————
Microsoft Active Directory Certificate Services
—————————
The system cannot find the file specified. 0x80070002 (WIN32: 2 ERROR_FILE_NOT_FOUND)
—————————
OK
—————————
All your inputs are welcome ..
Thanks.
You talk about the BEDROCK-ECA%8%9.crl file in your script but you do not generate it in your procedure.
I do not know where the bedrock-eca files came from. The service will not start on the issuing CA for me. Trying to start the service from the Certificate Authority Manager, it says the certificate for Issuing CA is missing, do I want to install it. (I thought the install certificate step took care of this but apparently not?) I say yes, browse to the crt file that was signed by the root CA. The service start up then fails, saying a new certificate authority cannot be installed because the CA Version extension is incorrect.
The BEDROCK-ECA file is just a name for the secondary CRL that is used for revoking certificates that are issues by the Subordinate CA – you can name is anything you want as long as it is not the same as BEDROCK-ROOT.
I believe he meant it as “Bedrock External Certificate Authority” or something along the lines but failed to explain that.
For those who have a problem issuing the certificate for CA:
Follow these steps on the CA:
Uninstall-AdcsCertificationAuthority
certutil -csp ksp -delkey “yourca”
Edit the c:\windows\capolicy.inf
Change the OID to the same as your Root CA has in it’s c:\windows\capolicy.inf file.
This guide should be updated to use the same OID in both files.
Hey!
Amazing write up and it’s exactly what I needed to get started for our domains setup.
Quick question, I don’t have a delta crl listed at all. Was there something I might’ve missed?
Hi Timothy,
First of all thanks for your tutorial.
I face to some troubles during the step 9 of “Submit Certificate Request to RootCA”. The .req file is correctly created and treated by my RootCA but no .crt file is created. The console shows an issued certificate corresponding to the .req file but i can’t find the .crt file.
Do you have an idea to solve this issue.
Thanks in advance.
I Timothy,
First thing, thanks for all this step-by-step for 2 tier pki, it’s reaaly awesome.
I’m encounter problem when i’m trying to issu the SubCA, I get this error 0x800b0113 and retruning me a different OID than what I put in my CAPolicy on the SubCA.
for be clear when I create the Root CA, I put this OID : 1.3.6.1.4.1.xxxxx.1.1. In the CA Policy in the SubCA I tryied this 1.3.6.1.4.1.xxxxx.1.1 and 1.3.6.1.4.1.xxxxx.1.2 and alwayd get the same error (Error when creating ou publishing certificat. invalid issuance strategies : 1.3.6.1.4.1.xxxxx.1.2).
Do you have any idea why i’m getting this error ?
Hey Timothy, we are just wondering, are you deploying a domain joined server publiciy??? My boss is refusing to do that, I can understand his arguments, can you give me some information why you did it this way?
None of the servers are public. The only public server is a VPS that runs the external public company website, which is where the CRL/AIA points to on the certificates.
How easy is it to issue a web certificate to use with one of our internal IIS websites?
Hmm I am getting access is denied errors when running certutil -crl and I see in the event viewer that my file://\\ entry is throwing access denied errors for base and delta crl publishing. Also in PKIView my http://pki.domain.com/pki/certificatename.crl says unable to download.
Have you figured out the fix? I see same access denied in my environment…
Did you get an answer here
This is awesome, one small question: how did you obtain BEDROCK-ECA.crl and BEDROCK-ECA+.crl?
Thanks!
Very good series. However, the certificate names and URI can be made simpler. If you choose simple names for both CAs without spaces, it makes life so much easier.
On the root CA:
AIA – C:\Windows\system32\CertSrv\CertEnroll\.crt
http://pki.somedomain.com/pki/.crt
CRL – C:\Windows\system32\CertSrv\CertEnroll\.crl
http://pki.somedomain.com/pki/.crl
On the issuing CA you use exactly the same paths and there is no need to rename any files or suchlike. On the issuing CA the names are actually not coherent at all in the examples.
Of course, I wasn’t thinking and all variables withing bracket were stripped off. They should be (with proper brackets) CaName,CertificateName.crt for AIA and CaName,CRLNamesuffix,DeltaAllowed.crl for CDP in all cases.
I’m having an issue “Installing CA Certificate…” On the Enterprise CA. When I click on it, nothing happens. Both CA servers are running 2016 Core, so I’m managing them from a third server.
What kind of issue?
Yes, the instructions for installing the subordinate (issuing) CA certificate does not work for a core installation managed from another server.
Simple solution: On the subordinate/issuing CA, from the command prompt type:
certutil -installcert C:\issuingCACert.crt
Start the CA service.
Nice one, thanks!!
Works finally on server core
I would say this is the best article which I found so far. Thanks for sharing.
I would like to ask few questions.
1. On IIS server is it possible to remove “Default Web Site” and create a new site for this purpose then publish PKI virtual app?
2. When installing Enterprise CA, in CAPolicy.inf do we need to change the OID with random OID generated from the vba script provided on Microsoft gallery?
(https://gallery.technet.microsoft.com/scriptcenter/56b78004-40d0-41cf-b95e-6e795b2e8a06)
Because of part of CA as Webser Default Web Site is part of IIS better to leave it alone.
To be more clear it is possible to Add new PKI web site, plus virtual directory as PKI and AIA/CDP for CRL during configuration as example http://SVR1.localdomain/PKI/.crl for CRL or
http://SVR1.localdomain/PKI/.crt for AIA
Hi! I would also like to know regarding OID? Can we leave it the same way as described in this tutorial or do we need to generate something?
Thank you!
Excellent guide! Can’t wait for the next sections.
I ended up with an extra cps.html in the pki share when comparing to the final wrap-up section in Part4.
Also, if it saves someone else a night.. My ‘certutil -crl’ command on the IssuingCA was failing with access denied. The IssuingCA server should be rebooted after installing ADCS so it updates it’s group membership of ‘Cert Publishers’.
Very good instructions. Is there any chance to see part5, part 6, etc.?
Thank you.
Yes, I am almost finished with Part 5… I have been for a while but I’ve been very busy lately.
I could only manage to squeeze in a few quick posts here and there, but I do plan on releasing parts 5 and 6 soon.
Part 5 is actually very long and involved. I hope to have it out this week.